Easy Microwave Caramels: No Thermometer Needed for Homemade Perfection
Imagine sinking your teeth into a perfectly soft, impossibly chewy caramel, rich with buttery flavor and just a hint of sea salt. Now imagine making that decadent treat in mere minutes, without the intimidating stovetop stirring, precise temperature monitoring, or specialized equipment usually associated with candy making. Welcome to the world of microwave caramels – a revolutionary approach to homemade confectionery that promises gourmet results with minimal effort. This isn't just a convenient recipe; it's a foolproof method for anyone who craves the satisfaction of homemade candy without the stress.
Gone are the days of wrestling with candy thermometers and fearing scorched sugar. With simple pantry staples and the power of your microwave, you can whip up a batch of these delectable, old-fashioned-style caramels that are perfect for gifting, holiday dessert trays, or simply satisfying your sweet tooth. Prepare to discover your new favorite stress-free dessert.
The Magic of Microwave Caramels: Simplicity Meets Sweetness
The allure of microwave caramels lies in their sheer simplicity and astounding effectiveness. It’s a method that truly democratizes candy making, opening the door for beginners and busy individuals alike to create confections that taste like they came from a high-end candy shop. The entire process takes place in a single microwave-safe bowl, eliminating the need for constant supervision and messy cleanup.
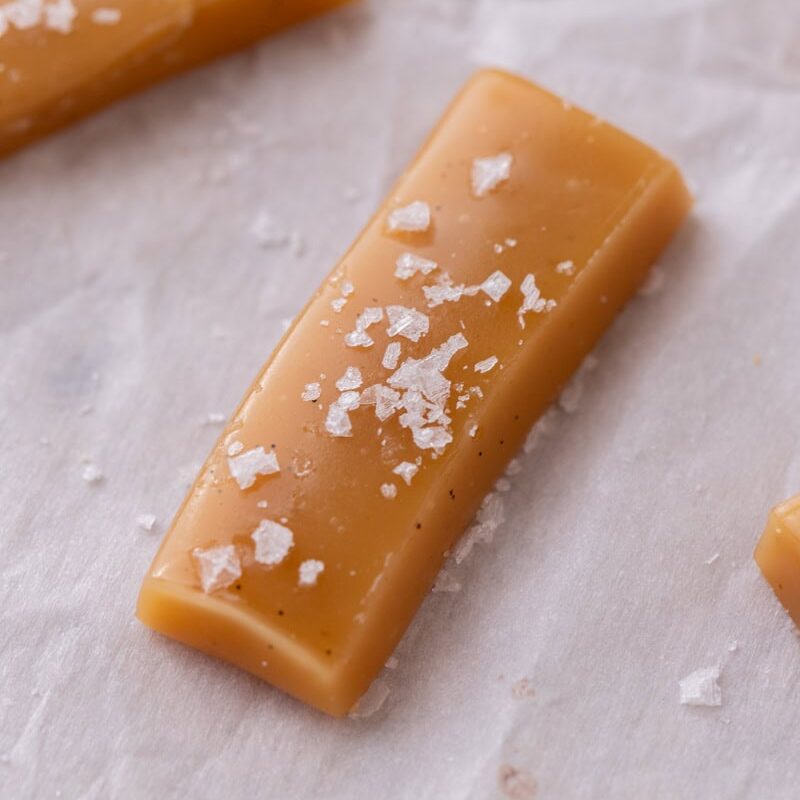
At its core, this recipe relies on a harmonious blend of everyday ingredients: rich butter, a mix of granulated and brown sugars for depth, light corn syrup to prevent crystallization, and sweetened condensed milk for that signature creamy, chewy texture. These ingredients, when combined and heated in short bursts in the microwave, transform into a smooth, glossy caramel mixture. The beauty is that the microwave provides a gentler, more controlled heating environment than a direct stovetop flame, significantly reducing the risk of burning and making the process incredibly forgiving. Once the mixture reaches its perfect stage, it’s simply poured into a prepared pan, allowed to cool, and then cut into delightful squares. A final sprinkle of flaky sea salt elevates the flavor profile, balancing the sweetness with a touch of savory sophistication.
Why Microwave Caramels Are Your New Go-To Treat
There’s a compelling list of reasons why this microwave caramel recipe consistently wins over anyone who tries it. It's more than just a quick fix; it's a reliable, delicious solution for various sweet cravings and gifting needs.
*
No Candy Thermometer Required: This is arguably the biggest selling point. We'll show you a simple, traditional method – the soft-ball test – to determine doneness without any special tools.
*
Ready in Minutes: From mixing to microwaving, the active time is incredibly short, making it ideal for impromptu treats or last-minute gifts.
*
Foolproof for Beginners: The gentle, incremental heating of the microwave significantly reduces the chances of errors, making it a perfect starting point for novice candy makers.
*
Uses Simple Pantry Ingredients: You likely already have everything you need on hand, eliminating the need for a special grocery trip.
*
Soft, Chewy, Buttery Perfection: The resulting caramels boast a luxurious texture that melts in your mouth and a rich, old-fashioned flavor.
*
Minimal Cleanup: With just one microwave-safe bowl and one baking dish, post-candy making tidying is a breeze.
*
Versatile for Any Occasion: These caramels are perfect for holiday gift baskets, party trays, cookie boxes, or simply enjoying as a personal indulgence. For more ideas on gifting, check out our article on
Quick & Simple Microwave Caramels: Perfect for Holiday Gifting.
*
Keeps Exceptionally Well: Stored in an airtight container, these caramels stay fresh and delicious for weeks, allowing you to make them ahead of time.
Unveiling the Science: How These Caramels Work So Well
Understanding the "why" behind this recipe's success adds another layer of appreciation for its genius. Each ingredient plays a crucial role, and the microwaving method itself is key to achieving that perfect caramel consistency.
Key Ingredients and Their Roles
*
Sweetened Condensed Milk: This ingredient is a true workhorse in microwave caramels. It provides a significant portion of the sugar and dairy solids needed, contributing to the rich, creamy flavor and, crucially, a wonderfully chewy texture. It's what gives these caramels their delightful bite without being overly sticky.
*
Light Corn Syrup: Often a source of confusion for new bakers, corn syrup is not just a sweetener here; it's a vital anti-crystallization agent. Sugar molecules, when heated, can sometimes bond together and form large crystals, resulting in a grainy or brittle candy. Corn syrup, with its glucose content, interferes with this crystallization process, ensuring a smooth, velvety caramel texture.
*
Butter: Essential for that classic buttery flavor and luxurious mouthfeel. It also contributes to the caramel's overall richness and helps create a tender, less sticky final product.
*
Granulated and Brown Sugars: The combination of both sugars adds depth and complexity to the flavor profile. Granulated sugar provides foundational sweetness, while brown sugar brings molasses notes, adding a more complex, almost toasted flavor that deepens during cooking.
The Microwave Method: Even Heating Without the Guesswork
Traditional stovetop caramel requires constant attention to prevent burning and achieve even cooking. The microwave, however, offers a different approach. By cooking the mixture in several short intervals and stirring thoroughly between each, you achieve a remarkably even heating without scorching. This allows the sugars to melt and caramelize gradually and consistently.
The most ingenious part, and where the "no thermometer needed" promise truly shines, is the reliance on the
soft-ball test. This classic confectionery technique allows you to gauge the caramel's doneness by observing its behavior in cold water. Here's how it works:
1. Towards the end of your microwaving intervals, drop a small amount (about 1/2 teaspoon) of the hot caramel mixture into a cup of very cold water.
2. Let it sit for a few seconds, then gather the cooled candy with your fingers.
3. If the caramel forms a soft, pliable ball that holds its shape but is easily flattened when pressed, it has reached the "soft-ball stage" (approximately 235-245°F or 113-118°C). This is the perfect consistency for chewy caramels.
4. If it's too sticky or dissipates, it needs more cooking. If it's too firm or brittle, it's overcooked. A little practice makes this test incredibly accurate and empowering for any home candy maker.
Elevate Your Homemade Caramels: Tips and Variations
While the basic recipe for microwave caramels is wonderfully simple, a few tips and creative additions can elevate your homemade treats from great to absolutely extraordinary. This is where you can truly make them your own.
Essential Tips for Perfect Microwave Caramels Every Time
*
Use a Large Microwave-Safe Bowl: The caramel mixture will bubble up significantly, especially in the later stages. Using a bowl that's at least twice the volume of your ingredients will prevent boil-overs and messy cleanup.
*
Stir Diligently Between Intervals: Don't skip this step! Thorough stirring ensures even heat distribution, prevents hot spots, and helps the ingredients fully combine, leading to a smooth, consistent caramel.
*
Prepare Your Pan Properly: Lining an 8x8-inch or 9x9-inch baking dish with parchment paper is crucial. For easy removal, let the parchment paper overhang the sides. A light greasing of the paper itself will also prevent sticking.
*
Patience During Cooling: Resist the urge to cut the caramels before they are fully cooled and set. This can take several hours at room temperature, or you can speed it up slightly in the refrigerator. Proper cooling ensures clean cuts and the perfect chewy texture.
*
Use a Sharp, Oiled Knife: Once cooled, a sharp, lightly oiled knife (or even a pizza cutter) will make cutting the caramels into neat squares much easier and prevent sticking.
*
Proper Storage: Store your finished caramels in an airtight container at room temperature. For longer freshness, you can individually wrap them in wax paper or cellophane squares.
Creative Twists and Flavor Enhancements
The versatility of microwave caramels means you can customize them to suit any taste or occasion.
*
Flaky Sea Salt: A classic for a reason! Sprinkle a good quality flaky sea salt over the warm caramel just after pouring it into the pan. The salt crystals provide a delightful textural contrast and a sophisticated counterpoint to the sweetness.
*
Chocolate Dipped Caramels: Once your caramels are cut and cooled, dip them halfway or fully into melted tempered chocolate (dark, milk, or white). Allow the chocolate to set on parchment paper for an extra decadent treat.
*
Nutty Caramels: Fold in chopped toasted pecans, walnuts, or almonds during the final stirring interval, or sprinkle them over the top before cooling.
*
Extract Variations: While vanilla extract is standard, consider adding a touch of almond extract, rum extract, or even a few drops of food-grade essential oils like orange or peppermint for a unique flavor twist. Add extracts after microwaving, before pouring into the pan.
*
Spice it Up: For holiday seasons, stir in a pinch of cinnamon, nutmeg, or pumpkin pie spice into the mixture during the last few minutes of cooking.
*
Swirls and Layers: For a marbled effect, drizzle melted chocolate or a different flavored caramel over the top of the plain caramel before it sets, then swirl gently with a knife.
For even more specific tips on achieving that perfect chew, you might find our guide
Foolproof Soft & Chewy Microwave Caramels in Minutes particularly helpful.
In conclusion, microwave caramels are a game-changer for anyone who loves the taste of homemade candy but shies away from complex recipes. With no candy thermometer required, minimal equipment, and just a handful of everyday ingredients, you can create soft, chewy, and utterly delicious caramels that rival any store-bought variety. Whether you're making them for festive gifts, a special occasion, or simply a well-deserved treat, this foolproof method guarantees perfect results every time. So go ahead, embrace the simplicity and joy of microwave caramels – your taste buds (and your stress levels) will thank you!